My quick convertible water cooled to air cooled Ruger 10/22 stock
-
Recently Browsing 0 members
No registered users viewing this page.
-

Use Promo Code "NJGF10" for 10% Off Regular Items
-
Supporting Vendors
-
-
Latest Topics
-
-
-
Posts
-
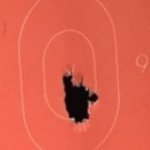
 Ahhh ... Chicken Wing ! It works when you practice it. Nice unsupported offhand, sir.
 -
 Got the date on my calendar, can't commit yet.
 -
 Thank you for that information Mr.Stu!!
 -
 Bump, new prices! Wilson EDC X9, 4 Magazines, Including New Crossbreed IWB Holster. $2400 OBO Wilson P99c, 4 Magazines. $550 OBO
 -
-
-